Using QuickBooks to Send an Email to All Your Customers
By My Service Depot on Thursday, November 19, 2020Need to contact all your customers at once? Here's how!

Whether you’re smack dab in the middle of a pandemic and you need an efficient way to relay your company’s policy changes to your customers, need to inform them about changes in regulations for the equipment you service for them, want to send out an email blast about the next month’s scheduled services, or you just want to drum up business with a seasonal special, a mass emailing could do the trick. In this article, we’ll cover how to use Microsoft Office Word Mail Merges in conjunction with the accounting software QuickBooks and the scheduling software Smart Service to do exactly this!
Leveraging Reports for Extra Functionality
Smart Service and QuickBooks offer a wealth of valuable reports that give you important insight into your business, but you can also use these for your mass communication efforts. Below we have a Customer Contact List report with a few simple adjustments, as it appears in QuickBooks:

This report gives you a ton of relevant customer data fields. (Try breaking names and addresses into individual fields so you have even more data to work with.)
You can find information on the next step (exporting using the “Excel” button at the top) at this link. Smart Service will allow you to create the same report, as well as export it to a .CSV file for Microsoft Excel.
Make sure you name the exported file appropriately and take note of the location it saves to. With this list of customers, we now have our data source for our Microsoft Word Mail Merge.
Setting Up Your Data Source
Open a blank Microsoft Word Document, then “Save As: Word Template” file type with the name for your template. Find the “Mailings” ribbon button and hit “Select Recipients.” Choose “Use Existing List.”

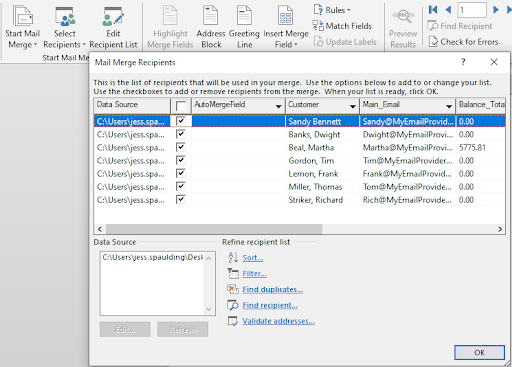
Here you will select the data source you exported from Smart Service or QuickBooks. Once you’ve selected that, you should see the “Edit Recipient List” button unlock, which opens the door for clearing out duplicates and bad data, so that when you send your final message to your customers, you can avoid any pesky mistakes!
Making a Template and Reviewing Results
Unfamiliar with how the mail merge functionality works? When we create a template, we will use the data source to insert specific information into the document. As you write your email, use the “Insert Merge Field” option to insert relevant fields. You can use these templates to make canned email messages, create fliers specific to a customer, or print mailing labels.
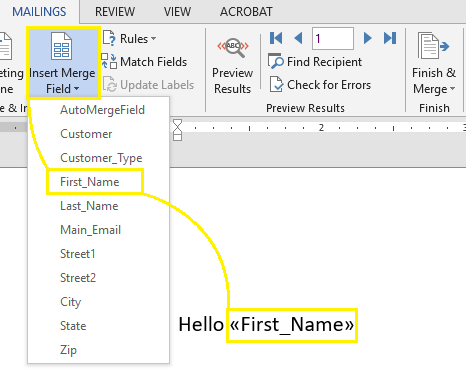
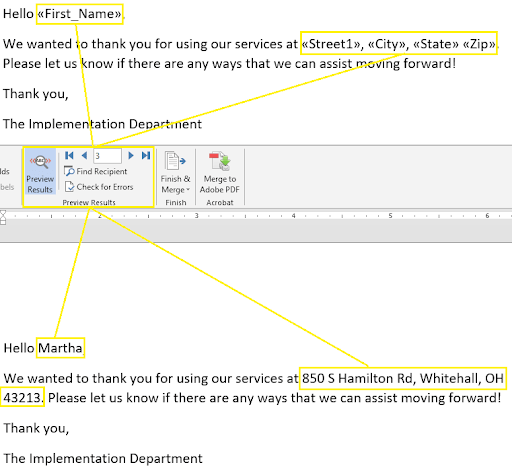
Note that the fields in my list of fields are the same as the labels from the report we ran in QuickBooks. Once you have your template set up, you can preview the document by clicking “Preview Results” and cycling through the results. When you start previewing results, your view should go from the first portion of the image below to the bottom portion.
Finish & Merge
After carefully reviewing what you want to send out, you can proceed to the last step. At this stage, you will have the option to “Finish & Merge”.
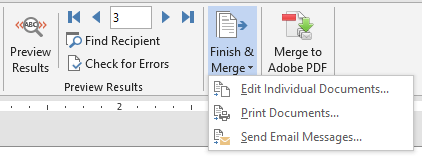
Depending on what you want to do, you could view the output from your preview by using “Edit Individual Documents.” From here, you can select the range of results to make adjustments to, print them directly (for direct mail), or “Send Email Messages.”
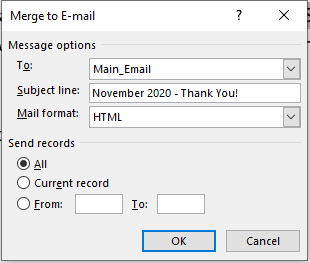
In the “To:” line, select the corresponding email field from your data source, write your subject line, and select the records to send to.
As a word of caution, your email service provider may have a limit on the number of emails you can send out in a given day, so please consult your provider or an IT professional before sending out an email to hundreds or thousands of clients to avoid interruptions in your email functionality. Also, make sure your message falls within the parameters of the CAN-SPAM Act.
With this “write it once” option, you can provide your customers with a more personalized touch, without the need to manually set up individual messages. Let your computer and software handle the heavy lifting so you can focus on providing a better experience for your customers. Follow these steps and you can rapidly disseminate important information to your customers, without having to worry about how you will manage to contact 100, 1,000, or 10,000 different people!