Inspection reports, service invoices, work orders, install checklists, pre-authorization sign-offs, certificates of destruction, maintenance contracts: forms are the operational backbone of a service business. The business that runs on a clean, fillable PDF for every customer interaction looks more professional, makes fewer transcription mistakes, gets paid faster, and pulls a full job history out of the cabinet in seconds rather than minutes.
This guide walks through what to put on a service form, how to draft it in Word or Google Docs, how to convert the finished document into a fillable PDF using Acrobat Pro or a free alternative, and how to integrate the result with Smart Service so the tech in the field fills it on a tablet and the office sees the completed form the moment the job closes. A real chimney inspection form serves as the worked example.
Plan the Form Fields
The cleanest fillable PDF starts with a paper sketch of what the form has to capture. The four most common service-trade form types each have a recognizable field set.
Inspection Reports
An inspection form needs a customer block with name, service address, and phone, an equipment identifier block with make, model, and serial number, a checklist of inspection points scored pass or fail, a notes field for each failed point, a photo upload spot, the inspector's name and license number, and a customer signature line. Trade-specific examples include the HVAC seasonal tune-up, the chimney sweep inspection, the fire-alarm device test, and the plumbing backflow report.
Service Invoices
An invoice form needs the header with company logo and license number, the customer billing block, an itemized line-item section for labor and parts, subtotal and tax fields, the payment-terms block, and a customer signature confirming the work. The Smart Service deeper breakdown on electrician invoice fields covers the trade-specific requirements that go on every invoice.
Certificates and Sign-offs
A certificate of destruction or completion needs the customer information block, the equipment or material destroyed or completed, the date and location, the technician's certification, and a customer acknowledgment signature. Pre-authorization sign-offs add a scope-of-work block and an estimated-cost block before the customer signs.
Work Orders and Checklists
An internal work order needs the job number, dispatch date, assigned tech, customer reference, scope-of-work block, parts-pulled list, hours-worked tally, and the close-out signature line. Install checklists are work orders with a structured procedure block instead of an open scope.
Draft in Word or Google Docs
The cleanest place to lay out the form is a word processor. Microsoft Word and Google Docs both handle the layout work without any specialty software. Use a one-page or two-page layout with the company logo and contact block at the top, the customer block below it, the main content area in the middle laid out as tables, columns, or grids depending on the form type, and the signature line and date at the bottom. Save the finished document as a standard PDF, not as a scan. A scanned paper form looks grainy and prints darker than the original. The saved-as-PDF version stays crisp at every print size.
Make It Fillable in Acrobat
The PDF that comes out of Word or Google Docs is static. The next step is to add the fillable fields. Adobe Acrobat Pro is the industry-standard tool, priced as a subscription that runs around $20 to $30 a month depending on whether the plan is annual or month-to-month (check Adobe for current pricing). Free alternatives like PDFescape and Sejda produce the same underlying form specification at no cost, with a few feature limits on the free tiers. Paid alternatives like Nitro PDF Pro and Wondershare PDFelement typically run at lower price points than Acrobat with comparable feature sets.
In Acrobat Pro, open the saved PDF and click Prepare a Form from the All Tools panel. Acrobat scans the document and auto-detects places where a fillable field belongs, including anywhere the layout has a line, a box, or a label followed by white space. The screenshot below shows the Prepare Form entry point in the Acrobat interface.

Review what Acrobat auto-detected, drag-place any missing fields manually, and set the field type for each: text field for names and addresses, checkbox for pass/fail, dropdown for trade-specific lists, signature field for the customer line, and date field for any timestamp. Right-click each field to set properties like required-versus-optional, character limits, and format validation. The second screenshot shows the field-placement interface mid-edit.

Save the document as a fillable PDF. Test the form by opening it in a separate PDF reader and filling every field. The exported result should accept input, validate the formatted fields correctly, and let the user save the completed document with their data embedded.
A Chimney Inspection Example
The chimney sweep inspection report below shows what a well-designed fillable service form looks like in practice. It hits every requirement of a real service-trade form: a clear company logo, an obvious form name, customer and equipment blocks, a visual diagram for the inspector to mark pass-or-fail by chimney section, a notes column tied to each section, and a signature line at the bottom for the customer to acknowledge the work.
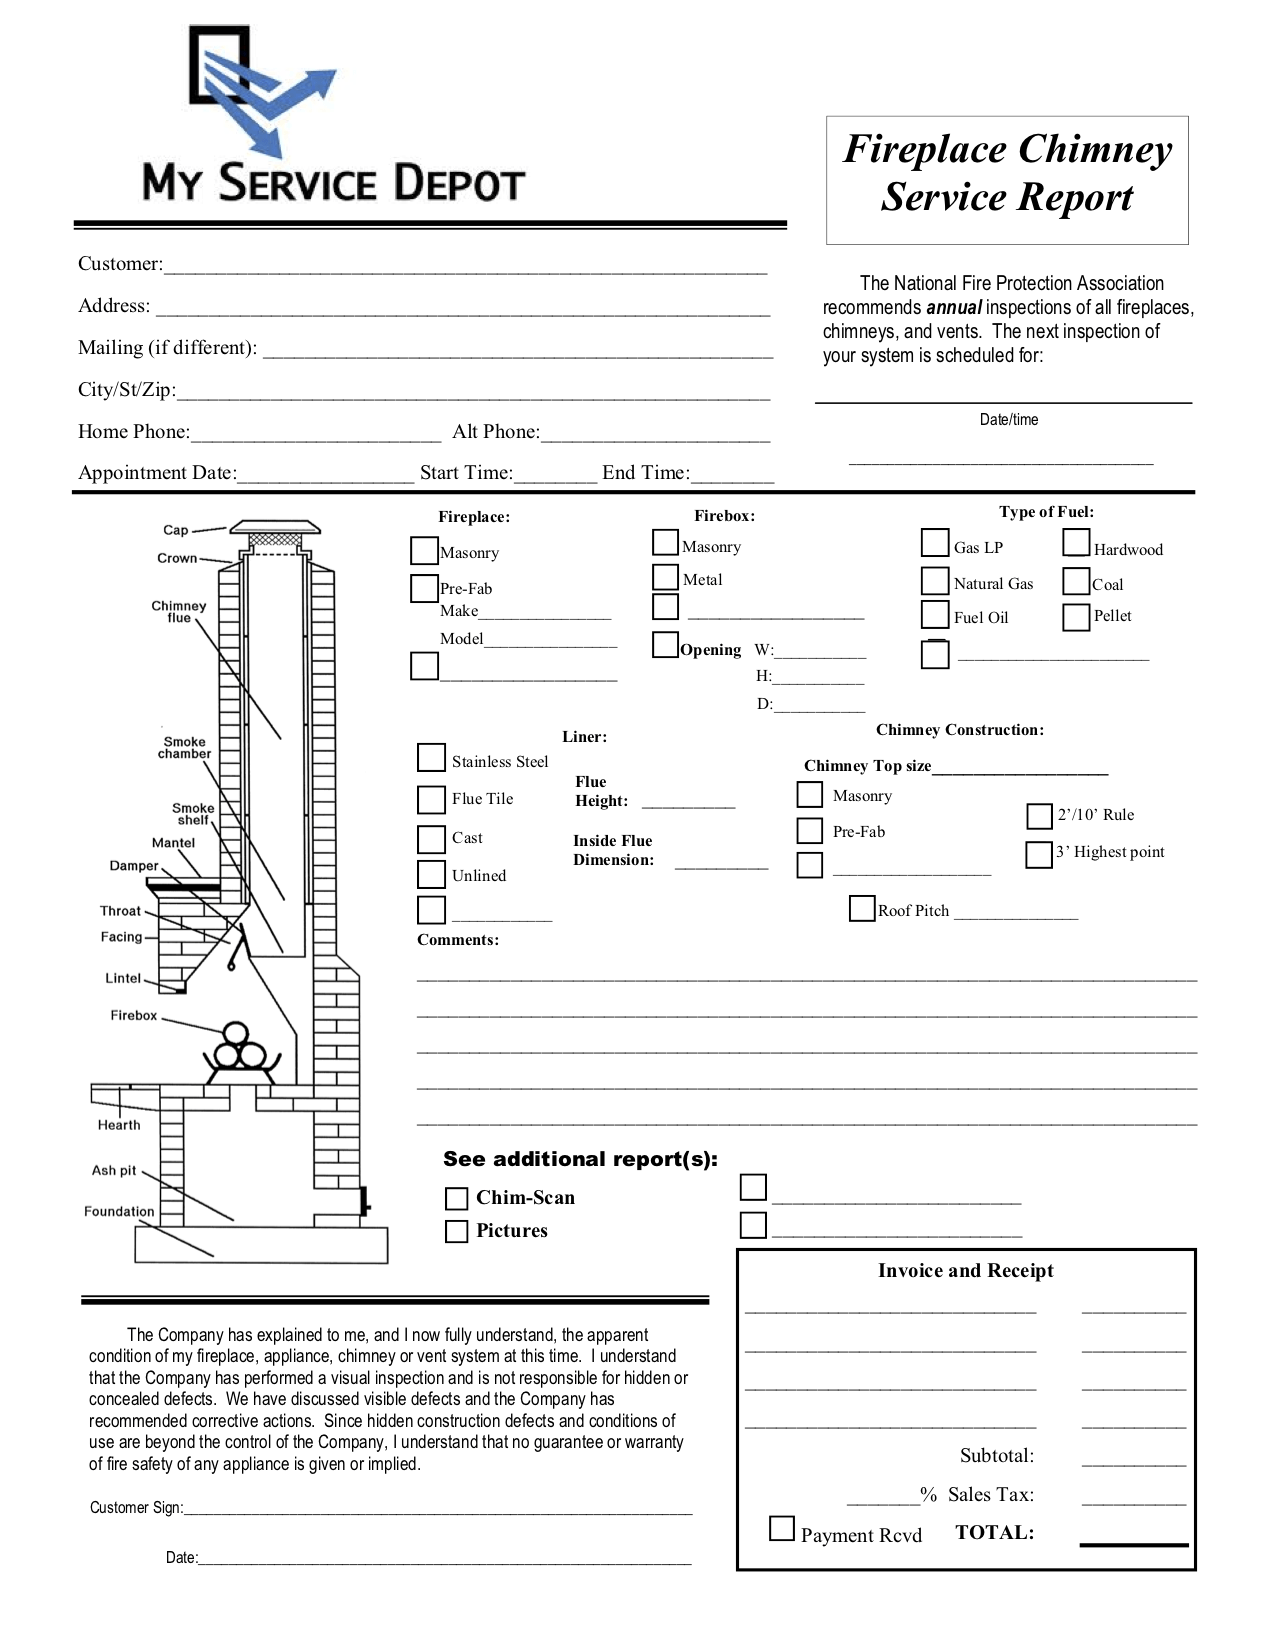
The diagram-plus-checklist pattern works for any inspection trade where the form needs to document the condition of a physical structure section by section. Roof inspections, HVAC equipment surveys, plumbing rough-in checks, and electrical-panel audits all benefit from the same layout.
Integrate With Smart Service
The fillable PDF is the deliverable. The integration with field service management software is what turns it from a digital document into a real operational workflow. Smart Service imports custom fillable PDFs into the platform and binds the form fields to the customer, job, and equipment records. When a tech opens the form on the iFleet mobile app, the customer name, address, phone, equipment make and model, and job number all pre-fill from the customer record. The tech only fills the fields specific to the inspection or service call.

Completed forms attach to the job record when the tech closes the job, sync back to the office automatically, and land in the customer history file for future reference. Smart Service comes in two products matched to the business's QuickBooks setup. Smart Service Desktop pairs with QuickBooks Desktop for businesses running Pro, Premier, or Enterprise. Smart Service Cloud works with QuickBooks Online, QuickBooks Desktop, or as a standalone platform, with a modern cloud-app feature set. The QuickBooks edition decision guide covers which one fits a given business.
The fillable PDF is the small upgrade that pays back every day in cleaner customer records, faster invoicing, and fewer mid-job phone calls back to the office. A business that takes the time to build the right forms once and integrates them into the dispatch workflow does the same number of jobs in less time with fewer transcription errors.
Smart Service for Field Service
If you are running a field service business and want the forms layer connected to scheduling, dispatch, customer history, mobile invoicing, and recurring service contracts, Smart Service integrates with QuickBooks Desktop and QuickBooks Online and iFleet keeps techs in the field synced with the office. Try a free demo to see how it fits!