
Regularly Backing Up Your SQL Server Database
By My Service Depot on Monday, August 31, 2020Keep your critical business information safe with regular backups of your SQL server database.

Small to mid-sized service businesses using SQL servers have a lot of critical data flowing into their database from multiple office users and field service technician mobile devices. Losing even just one day of data can mean much more than a few lost invoices and payment information; it can mean a permanent loss of job data from your service technicians that forces you to scramble to reset schedules.
This sort of thing is going to happen. The only question is when. Preparation for the event will help minimize the loss of data and down time when it does. Lack of preparation may mean the loss of months’ worth of data and having your operations crippled for days while you try to get things back up and running. No one wants to re-enter setup data to get your field service technicians back online.
Your business should back up your SQL server database as frequently as possible. You should also be familiar with the process of restoring your data, so that when you need to, it goes smoothly and quickly. If you do not prepare for recovering from a crash, you will lose additional precious hours learning the restore process while your systems remain down in the middle of a busy day.
SQL server has two recovery models that we’re interested in: full or simple. Full recovery model is the optimum but requires advanced scripting. If you can hire a professional Database Administrator (DBA) with the experience necessary to do a full recovery, awesome! Unfortunately, many small businesses simply can’t afford this. Simple recovery mode is an alternative that is relatively easy to implement, even by someone who isn’t a professional programmer (someone with a proficiency with spreadsheets or dispatching software should suffice). Implemented properly, simple recovery mode can reduce the risk of data loss to a single day or even just a single hour.
The first thing you have to do is make sure you have SQL Server version that supports SQL Server Agent, Enterprise, or Standard edition. For most small businesses, Standard edition is enough and, at the time of this article, is priced at $3,189. That’s not nothing, but if you’re serious about protecting your critical field service business data, it’s well worth the investment.
There are two basic parts to a well-orchestrated business data backup and recovery plan. Part one is to implement and monitor automated, frequent backups. The more recent the backup was made prior to the crash, the less data you will lose. Part two is to practice restoring a database to assure you are comfortable with the process and can implement it quickly and smoothly when the inevitable crash happens. Part one is the focus of today’s article. Part two is covered in this article.
To implement and monitor automated backups, we need to complete five basic steps.
- Put the database in simple recovery mode.
- Configure SQL Server Agent with Sql Server Configuration Manager.
- Add a SQL Server Agent job to automatically run a nightly, full backup.
- Add a SQL Server Agent job to automatically run differential backups every hour during business hours.
- Monitor the jobs on a regular basis.
Step 1: Put the database in simple recovery mode.
Put the database in simple recovery mode using these steps, verbatim from Microsoft. If your database is in full recovery mode and you don’t actually have advanced scripting performing log backups, your log file will grow out of control and create other serious problems. While you’re in the Options pane, also set Auto Close to False to enhance performance.
Using SQL Server Management Studio
To view or change the recovery model:
- After connecting to the appropriate instance of the SQL Server Database Engine, in Object Explorer, click the server name to expand the server tree.
- Expand Databases, and, depending on the database, either select a user database or expand System Databases and select a system database.
- Right-click the database, and then click Properties, which opens the Database Properties dialog box.
- In the Select a page pane, click Options.
- The current recovery model is displayed in the Recovery model list box.
- Optionally, change the recovery model select a different model list. The choices are Full, Bulk-logged, or Simple.
- Click OK.
Step 2: Configure SQL Server Agent with Sql Server Configuration Manager
Use Sql Server Configuration Manager to assure SQL Server Agent is running and starts automatically when your server boots. If you can’t find it in your menus or search, that’s because it is a Microsoft Management Console snap-in. You can find it in C:\Windows\SysWow64 folder as something like SQLServerManager15.msc or SQLServerManager10.msc. Select the highest version you have, right-click on it and Pin to Start or Taskbar as desired. Run it, and you will see an entry under SQL Server Services for SQL Server Agent.
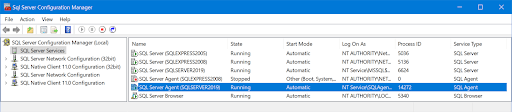
If Start Mode is not Automatic, right-click Properties and select the Service tab to set the Start Mode. If it’s not running, use right-click > Start.
Step 3: Add a SQL Server Agent job to automatically run a nightly, full back up.
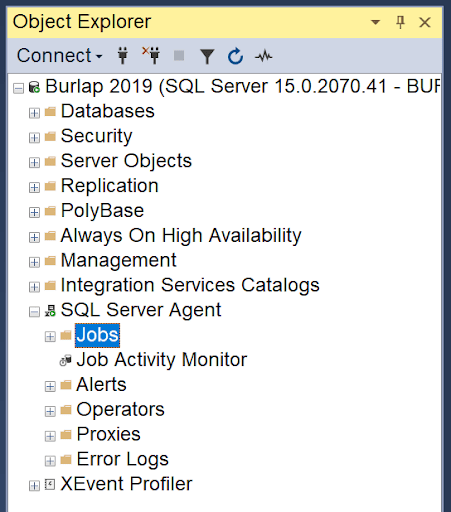
In the SQL Server Management Studio (SSMS) View menu, select Object Explorer. Connect to the server needed and you will see SQL Server Agent in the tree. Expand that to Jobs. The rest of our work will start here.
Right-click on Jobs and select New Job.
For the sake of brevity, we will list the highlights of what we need here. For a full breakdown of Agent Jobs, go here.
- In the New Job dialog > General page, choose a Name i.e., “Full Backup”.
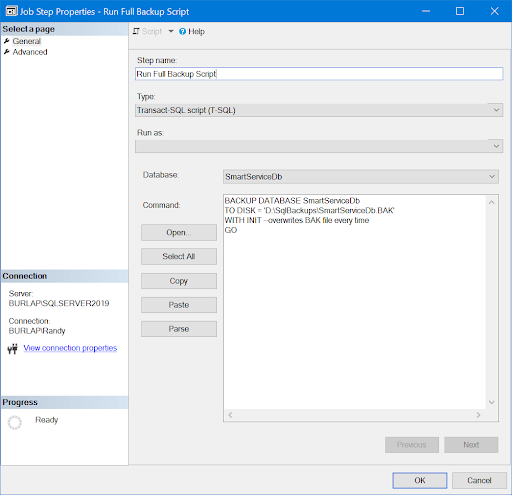
- Select the Steps page > New to open the New Job Step dialog. Give a Step name i.e., “Run Full Backup Script”. Make sure Type is Transact-SQL script. Use the database drop-down to select the database the script will run in. In this case, it can be the one you are backing up.
- Enter the following text into the Command box, adjusting your database name and path to the BAK file as needed:
BACKUP DATABASE SmartServiceDb
TO DISK = ‘D:\SqlBackups\SmartServiceDb.BAK’
WITH INIT –overwrites BAK file every time
GO
- Use the Parse button to assure the script syntax is correct. Click on the OK buttons to get back to the New Job Steps.
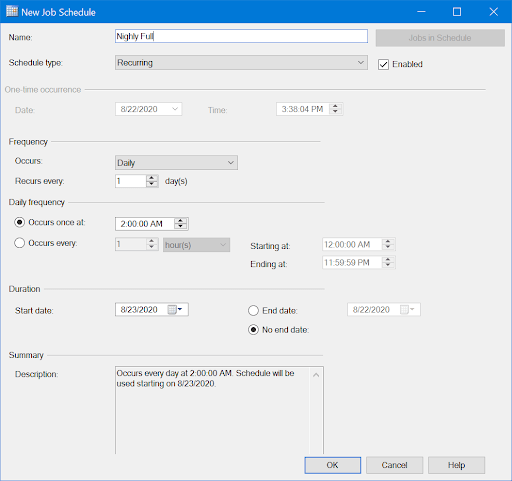
- In the New Job dialog, select the Schedules page, then click New.
- In the New Job Schedule, enter a Name (i.e., “Nightly Full”). Schedule type is Recurring. Frequency Occurs Daily, Recurs every 1 day(s), Occurs once at 3:00 AM. Duration Start date set to tomorrow and No end date.
- Click the OK buttons to save the schedule and the job. Back in SSMS Object Explorer, you can right-click on the job Full Backup to edit properties, view history, and Start Job at Step, which automatically starts it at Step 1. This job presumes you are backing up to a second, local drive with normal permissions. Backing up to a network drive is possible and actually preferable, but requires advanced work with security and permissions and is a topic for a future article.
Step 4: Add a SQL Server Agent job to automatically run differential backups every hour during business hours.
These steps are (just like the ones above) used to create the nightly full backup, but with some differences in detail.
- Create a new Agent job with a name like, “Differential Backup”.
- Add a new step i.e., “Run Differential Backup Script”. Set the database to the one we are backing up.
- In the Command box, enter the following script, adjusting your database name and path to the BAK file as needed. Be sure to use the same file name as the one used in the nightly full backup.
BACKUP DATABASE SmartServiceDb
TO DISK = ‘D:\SqlBackups\SmartServiceDb.BAK’
WITH DIFFERENTIAL –appends changes since last full backup
GO
- In the New Job dialog, select the Schedules page and click New.
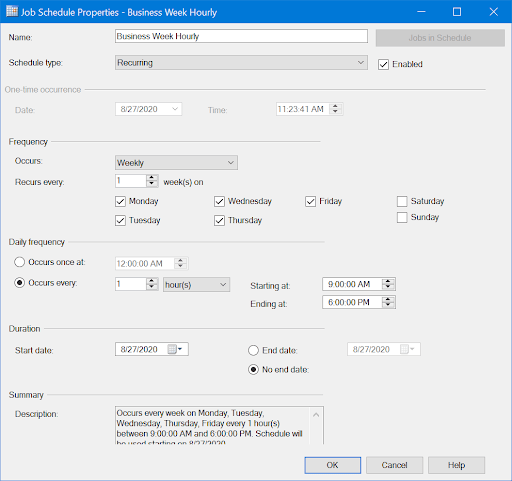
- In the New Job Schedule, enter a Name i.e., “Business Week Hourly”. Schedule type is Recurring. Frequency Occurs Weekly, Recurs every 1 weeks(s) on with the weekdays checked. Daily frequency Occurs every 1 hour(s), Starting at 9:00 AM, Ending at 6:00 PM. Duration Start date set to tomorrow and No end date.
- Click the OK buttons to save the schedule and the job. You may wish to schedule the differential backup more or less frequently as desired. Pay attention to the growth of the backup file size throughout the day, as each differential backup increases the size a minimum amount regardless of the amount of data changes. The next nightly full backup will start over and reduce the backup file size to one that has no differential backups appended.
Step 5: Monitor the jobs on a regular basis.
Sometimes things go wrong and the backups start encountering errors; a backup drive going bad is one example. If you don’t monitor the jobs, you won’t know when you’re missing backups until it’s too late. At least once a day initially, then once or twice a week after that, open SQL Server Agent Job Activity Monitor shown in the Object Explorer screenshot above.
Final Thoughts
That does it for our five step process. We’ve covered making sure the database is in simple recovery mode, configured SQL Server Agent to run automatically, added a job for the full nightly backup, added a job for the business week hourly differential backup, and covered how to monitor the jobs on a regular basis.
This concludes part one of our well-orchestrated business data backup and recovery plan. Follow this guide, and when a crash happens, you will be able to quickly restore your critical service business data and minimize the disruption to your field service technicians’ mobile devices.
Click here for part two of this series: Restoring Your SQL Server Database After a Crash